How to Encrypt Secrets with the AWS Key Management Service (KMS)
A Detailed, Step by Step Guide to Encrypting Secrets with AWS KMS Using the AWS CLI
Published by Carlo van Wyk on February 24, 2019 in Security

In this practical, example-driven guide, I'll explain what the Amazon Web Services Key Management Service (AWS KMS) is and why encrypting secrets is an essential security practice that everyone should adhere to. Then, I'll provide a deep dive on using the AWS KMS CLI to encrypt and decrypt secrets.
More specifically, I'll cover the following in this tutorial:
- What is AWS KMS?
- How does AWS KMS Work?
- How to setup AWS permissions
- How to install the AWS command line interface (CLI)
- Creating a KMS key
- How to encrypt secrets using the AWS KMS CLI
- How to decrypt secrets using the AWS KMS CLI
What is the AWS Key Management Service and Why Do I Need to Use it?
In this day and age, data breaches are a daily occurrence. If you're storing secrets such as passwords or API keys as clear text in your application's configuration, you're doing it wrong.
The vast majority of sites are hosted in some sort of shared environment. This means that anyone with access to your server such as a system administrator would be able to gain access to your passwords or API keys by simply opening your application's configuration file. That's how easy a data breach can occur.
If you're storing a cloud API key such as an AWS, Google or Azure API key in the clear, the consequences could most certainly be far worse. A single breached API key could provide access to multiple databases and servers — a whole stack — to an attacker.
Sensitive information that is encrypted using an encryption service like Amazon's Key Management Service would prevent situations where a server is compromised from leading to a data breach.
Don't I Need to Use an AWS API Key to Access the AWS KMS Service?
You might be wondering what the point of encrypting secrets are if you need an API key to access the AWS KMS service in the first place.
The correct way to do this is to deploy your VM instances with roles. These roles should have specific access to resources such as KMS keys. This eliminates the need to store an AWS API key in a configuration file for the purposes of accessing AWS KMS.
Any other secrets your application needs could then be stored in an encrypted configuration file.
How does AWS KMS work?
The concept is simple. Don't ever store secrets in the clear. Store them in a secure vault where they're encrypted at rest. When you need access to secrets, access them via the AWS SDK.
A typical use case would be where you want to encrypt the contents of a configuration file.
You start off by creating a new key for your application in AWS KMS using the AWS CLI. Then, you simply run an encrypt command that will encrypt your secrets against that key.
Whenever you want to access secrets from within your application, you'll typically use the AWS SDK to decrypt the values stored against your key.
What does AWS KMS Cost?
KMS costs $1 per key per month. The first 20,000 requests per month are free. Thereafter, you pay $0.03 per 10,000 requests.
So if you have one key and make 15,000 decrypt requests a month, your monthly cost would be $1.00.
On the other hand, if you have 1 key and make 99,000 decrypt requests and 1,000 encrypt requests a month, your monthly cost would be $1.24 ( (100,000 total requests - 20,000 free tier requests) x $0.03 / 10,000 requests ).
Typically, you'll want to use one or more keys per application. I tend to use 1 key per application, but your mileage may vary depending on your project's specific requirements and the need for clear separation of concerns. For instance, do you prefer having a central configuration file, or do you typically split configuration files out?
To keep your costs down, regardless of if you use 1 or more configuration files, I strongly recommend encrypting the entire contents of your configuration file, and to use in memory caching to cache the decrypted values.
More information on AWS KMS Pricing here: https://aws.amazon.com/kms/pricing/
Security and Account Housekeeping
Before we create a KMS key, we have to do some basic account and security housekeeping. We'll follow the principle of least privilege, which means that we only give the minimum amount of permissions to a specific user.
We'll do this by creating a policy with KMS rights and attach it to a new user. This ensures that this user only has access to KMS and nothing else.
Then, we'll install and configure the AWS CLI.
Creating a KMS Policy
To create a new policy, log in to your AWS console, and head over to Identity and Access Management at https://console.aws.amazon.com/iam/home
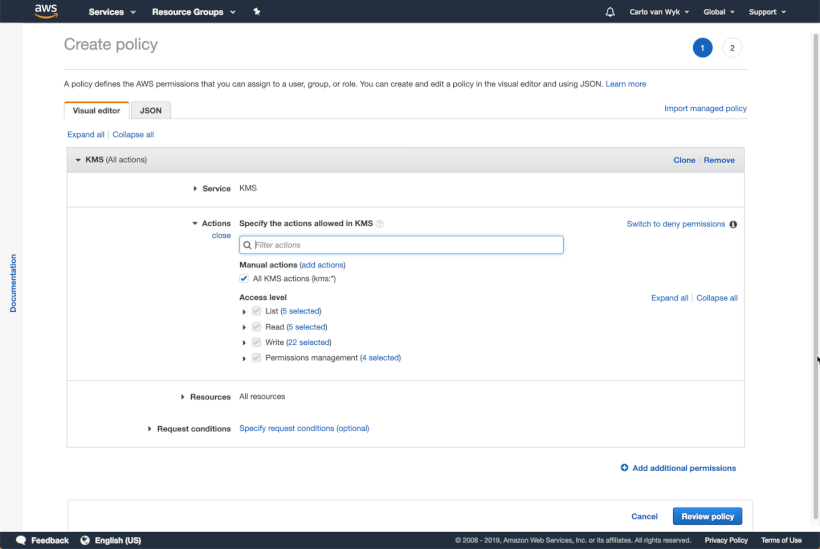
In the left hand pane, click Policies, and then click Create policy.
Under actions, use the values as shown below:

Continue to the next step and name your policy kms-access
Creating a New User
To create a new user, log in to your AWS console, and head over to Identity and Access Management at https://console.aws.amazon.com/iam/home
In the left hand pane, click users, and then click add user. Name your user kms-user.
Be sure to select programatic access only.
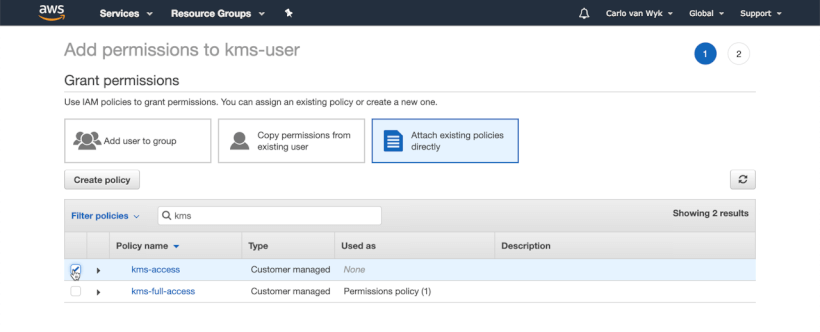
Follow the prompts and attach the kms-policy to the user as shown below:

Be sure to copy your Access Key Id and Secret access key on the final screen before proceeding with the next steps as you'll need these later.
Installing the AWS CLI
Next, install the AWS CLI.
If you're using Mac and the Brew package manager, installing AWS CLI is as simple as opening the terminal and running the following command:
brew install awscliIf you're not using a Mac, follow the instructions at https://docs.aws.amazon.com/cli/latest/userguide/cli-chap-install.html
Once you've installed the AWS CLI, run the following command (for PC and MAC):
aws configure
This command will prompt you for your access key id and secret key.
Now that we're done with the housekeeping tasks, we can start by creating a key in KMS.
Creating a AWS KMS Key
I'm going to create a new key and name it KMS Demo Application.
To create a new KMS key, open a terminal window and run the following command:
aws kms create-key --description "KMS Demo Application"
Results:
{
    "KeyMetadata": {
        "AWSAccountId": "xxx",
        "KeyId": "64dbfdcc-8519-4f8f-a1b2-d704e652259b",
        "Arn": "arn:aws:kms:us-east-1:362577346927:key/64dbfdcc-8519-4f8f-a1b2-d704e652259b",
        "CreationDate": 1550182425.784,
        "Enabled": true,
        "Description": "KMS Demo Application",
        "KeyUsage": "ENCRYPT_DECRYPT",
        "KeyState": "Enabled",
        "Origin": "AWS_KMS",
        "KeyManager": "CUSTOMER"
    }
}
Take note that you'll have to use your own KeyId when running commands from here onwards.
Encrypting Plaintext into Ciphertext
Now that we created a key, we can start encrypting plaintext into cyphertext. In cryptographic terms, plaintext is simply unencrypted text and ciphertext is the encrypted result. In our instance, plaintext is simply the contents of our configuration file.
For demonstration and costs purposes, it is more cost effective to encrypt the contents of a configuration file against a single KMS key, but in production you should always keep keys separate, in line with security best practices.
For this demonstration, I'll be encrypting the contents of my secrets.json configuration file:
{
	"mongoUsername": "mongo-user",
	"mongoPassword": "IRrE!jwcJkz5wGFb$Sx*$N@8^",
	"googleApiKey": "81cc9770-c3be-44d2-a18d-9039db1f062b",
	"facebookApiKey": "6b494a8e-f9a2-4774-8cb9-281bd73e9270"
}
Running the aws kms encrypt command will encrypt the contents of the file and store it in AWS KMS.
AWS KMS Encrypt on OSX and Linux
Running the AWS KMS Encrypt command is a 1 line, 1 step operation and more succinct than doing it on Windows.
The below command will encrypt plaintext to ciphertext, encode the ciphertext to Base64 and return this result wrapped in JSON. Then the Base64 encoded ciphertext will be extracted from JSON, and it will be decoded to binary. Finally, the binary will be saved to a file.
If that sounds like a lot to take in, don't worry. I'll explain it in more detail below, and there's diagrams that explains the process.
aws kms encrypt --key-id 64dbfdcc-8519-4f8f-a1b2-d704e652259b --plaintext file://secrets.json --output text --query CiphertextBlob | base64 --decode > secrets.encrypted.jsonOpening the secrets.encrypted.json file will reveal binary content as shown below.
0?0?0?g?`?He.0  ?D??L`??DW?d?`W??"b??????9??Aj?H?-0?)	*?H??
              ?w?H?
                   ճ???ݒ???
??rz??0???ڳ/??a?өF7??zYpw??Xdž?c???+?r??ʗf*?`i????F??V#?rד?9IΕ??K??+{&?S?E?N??Q?????[?8;??nR???3I?D?;e?ѩ?+?JT?:tCZ??? ????6?8??>	?mj?a9???6???a]ު????w5????Gq?sƬ
AMS KMS Encrypt on Windows
While the AWS KMS Encrypt command on Windows is more verbose (it's 2 commands) and a bit easier to understand.
The below command will encrypt plaintext to ciphertext, encode the ciphertext to Base64 and return this result wrapped in JSON. Then the Base64 encoded ciphertext will be extracted from JSON, and it will be saved to a file called secrets.base64.json
aws kms encrypt --key-id 3e80eed7-2c7e-48a4-8ef2-b4072c33f27b --plaintext file://secrets.json --output text --query CiphertextBlob > secrets.base64.jsonThe second part of the command simply takes the base64 encoded ciphertext in the secrets.base64.json file, decodes it to binary, and saves to to a file called secrets.encrypted.json
certutil -decode D:\projects\kms\secrets.base64.json D:\projects\kms\secrets.encrypted.jsonA Visual Explanation of the AWS KMS Encrypt Command
While the Windows commands are a little bit more verbose than the more succinct OSX command, it's not exactly clear what is occurring, or even in which order. There's a lot that's happening in the above commands. The best way to explain the encrypt process is through a simple diagram. (Click on the diagram for a larger version).

Let's go through the KMS Encrypt command as shown in the diagram above:
- The plaintext secret is provided as an option to the KMS Encrypt command via
--plaintext file://secrets.json - KMS Encrypt encryts the plaintext
- AWS KMS Encodes the result to Base64.
- The Base64 encoded ciphertext is returned in JSON format. Ordinarily the standard AWS encrypt command will just return the results in JSON to the terminal, and the process would stop here.
- The Base64 encoded ciphertext contained in the CiphertextBlob of the JSON results are decoded to binary
- The binary results are saved to a file
If you're wondering why the CiphertextBlob was decoded to binary, the answer to that is because the kms decrypt command expects binary input.
The default output for aws kms encrypt is a base64 encoded string. However, the aws kms decrypt command expects binary input.
Due to the fact that aws kms decrypt expects binary as input, the aws kms encrypt command was built up to take the default base64 encoded output and save it as a binary file.
Breaking down the AWS KMS Encrypt Command
Let's break down the aws kms encrypt command that we ran earlier into smaller steps so that we can understand the aws kms encrypt command better. I'll start with the most basic version of the command that outputs results as JSON to the terminal screen, and then I'll build up the command all the way to the where it is saving the results to a binary file which is the expected input of the KMS Decrypt command.
This time, let's run the following Kms Encrypt command which will simply encrypt the secrets file, encode it to base64, and return the results to the terminal in JSON format:
* The below command can be run on OSX and Windows
aws kms encrypt --key-id 64dbfdcc-8519-4f8f-a1b2-d704e652259b --plaintext file://secrets.jsonBreaking down the above command:
- The
--key-idis the key-id of your key. - The
--plaintextparameter reads in the contents of thesecrets.jsonfile

Results:
{
    "CiphertextBlob": "AQICAHgk4KLG1nZnyA8JokTKxExg+91EVz8GZMtgV5r0ImKJ2QFYCP9IuBbv1w4vduDowQYRAAABLTCCASkGCSqGSIb3DQEHBqCCARowggEWAgEAMIIBDwYJKoZIhvcNAQcBMB4GCWCGSAFlAwQBLjARBAwYdO9mDUMoKgH+9YACARCAgeEwVDZwFtIhdBL6JO2wNrcPyxdBEcTDbnqI81MyMSvNyGMEqZvZKQCHQElShUsHVqvIiW49KpCWvbbhzn6iPekYd+qaio59+mk4+AIMmQE8L43qMTKOobC/pUZeqQ1M/fqGqtzXpU0ezFhVMc7nDaVBj6VraQhCsaTuN4ZrJtRTD0c/SFcFXNvP0iN6wGaQAmU+TGIdK3Q9qOdCAp2k1254RrxM/A8Xtaw9cOJZea0e0d9O+IcET30vwLKNBy2ut96pPkAJCDuM6Gkvb8rHmjk69Ft7ClLKmSdKlYSS+WawPto=",
    "KeyId": "arn:aws:kms:us-east-1:362577346927:key/64dbfdcc-8519-4f8f-a1b2-d704e652259b"
}
So let's look at the results. Remember what I said earlier? The AWS KMS Encrypt in it's most basic form returns a JSON string. The ciphertext is in the CiphertextBlob property of the JSON object, and it's encoded as a base64 string. However, the aws kms decrypt command expects binary as input.
In order to save the encrypted results in a format that we can provide to the KMS Decrypt command, we need to build this command up to do the following:
- Extract the value of the CiphertextBlob in the JSON output as string. In other words, get rid of the JSON format and characters such as curly braces, quotes, etc.
- Decode the above base64 string to binary
Extracting the CiphertextBlob as text
Let's specify some additional options on the Kms Encrypt command which would allow us to query the results of the JSON returned by the aws kms encrypt command and extract the value of the CiphertextBlob property to text.
* The below command can be run on OSX and Windows
aws kms encrypt --key-id 64dbfdcc-8519-4f8f-a1b2-d704e652259b --plaintext file://secrets.json --output text --query CiphertextBlobBreaking down the above command:
--output textwill remove all of the JSON syntax such as the keys, curly braces and quotes--query CiphertextBlobwill filter the results and only return the value of CiphertextBlob

Results:
AQICAHgk4KLG1nZnyA8JokTKxExg+91EVz8GZMtgV5r0ImKJ2QEWAncRBvNhRk4+13E9S57DAAABLTCCASkGCSqGSIb3DQEHBqCCARowggEWAgEAMIIBDwYJKoZIhvcNAQcBMB4GCWCGSAFlAwQBLjARBAxj6nZOOzgKvdcNB1ACARCAgeHcqFxgBYT/Po0A7gz0rwZKThjHR5BchovuYaqaIKfTEreEYefNd9qhzrKyhvpqCbp6MykZQ9WnPZkdhEituu/IV6WxUuQ7LPLHw69z9SDwk335s+rc7nFHdFnSlfWdMB88vOsGHx5IZjsgymVVHW9jHa+TSgm6JLUKuMEkJ2Q5XsbWF3JZg7NwmruKBH+7SRUJihSFM8Fvgu8b8FZkUb2lQbBM8qFgcNgJH6oIPJlIJvIa9MOs6/+VuFbuNPDMtgGoA2a765Fzi7JoGi3mV+nddHaOfacKa+x8KUdk1IIxy6g=It's already looking a lot better. At this stage, all that's left to do is to decode base64 to binary, and save it to a file.
Decoding Base64 to Binary
Running the below command decodes base64 to binary and saves it to a file.
OSX and Linux command
aws kms encrypt --key-id 64dbfdcc-8519-4f8f-a1b2-d704e652259b --plaintext file://secrets.json --output text --query CiphertextBlob | base64 --decode > secrets.encrypted.jsonBreaking down the above command:
will decode base64 to binarybase64 --decode
saves the results to a file>
Windows commands
aws kms encrypt --key-id 3e80eed7-2c7e-48a4-8ef2-b4072c33f27b --plaintext file://secrets.json --output text --query CiphertextBlob > secrets.base64.jsoncertutil -decode D:\projects\kms\secrets.base64.json D:\projects\kms\secrets.encrypted.jsonOpening secrets.encrypted.json confirms that the results were saved as binary.
x$???vg? ?D??L`??DW?d?`W??"b??[?4d
0?0?0? `?He.0 #?-2kb?B?-0?) *?H??
r???!?*ߨ???3k??{2???O????\???X?eF???_?a?N
z&Z?I6? v?;
?F?O?ԸD??.?????&߅2<??2s?U ?fI???F?J FT?î6???/]??J??z?MYt]?_??-??21?'`?V??l??'9܊??????T?A?Fn\ ??̨?q?]a?+ɑG???.sO?/+&?"?L?k?Concluding the AWS Kms Encrypt command

That wraps up the AWS KMS Encrypt command. In essence, a series of options are provided to the AWS KMS Encrypt command so that the results are saved to binary, as binary is the expected input of the AWS KMS Decrypt command.
Decrypting
Thankfully, decrypting ciphertext to plaintext is not only a bit simpler, but the CLI command is a bit shorter as we don't need to supply the --key-id. Syntactically, the command is also very similar to the AWS KMS Encrypt command, which you should feel quite familiar with by now.
Decrypting on OSX and Linux
aws kms decrypt --ciphertext-blob fileb://secrets.encrypted.json --output text --query Plaintext | base64 --decode > secrets.decrypted.jsonThe above command decrypts ciphertext back to plaintext and saves the results to secrets.decrypted.json.
Decrypting on Windows
aws kms decrypt --ciphertext-blob fileb://secrets.encrypted.json --output text --query Plaintext > secrets.decrypted.base64The above commands decrypts the ciphertext and encodes it to base64.
certutil -decode D:\projects\kms\secrets.decrypted.base64 D:\projects\kms\secrets.decrypted.jsonAnd finally, base64 is decoded to plaintext.
Opening up secrets.decrypted.json confirms that the results are identical to the plaintext file secrets.json that we started out with.
{
	"mongoUsername": "mongo-user",
	"mongoPassword": "IRrE!jwcJkz5wGFb$Sx*$N@8^",
	"googleApiKey": "81cc9770-c3be-44d2-a18d-9039db1f062b",
	"facebookApiKey": "6b494a8e-f9a2-4774-8cb9-281bd73e9270"
}
Let's delve a little bit deeper into the aws kms decrypt command. I won't go into as much detail as I did with the AWS KMS Encrypt command. Instead, I'll only cover the key differences.
ciphertext-blob
The --ciphertext-blob option reads binary data in from secrets.encrypted.json, and outputs the decrypted plaintext as a Base64 encoded string in a JSON object.
Note that we specificied fileb:// and not file:// as was the case with the encrypt command. This is because the encrypt command expects plaintext while the decrypt command expects binary data.
Let's go ahead and run the aws kms decrypt command with just the --ciphertext-blob option specified.
* The below command can be run on OSX and Windows
aws kms decrypt --ciphertext-blob fileb://secrets.encrypted.jsonA JSON object is returned to the terminal which is identical to the JSON object which was returned by the encrypt command.
{
    "KeyId": "arn:aws:kms:us-east-1:362577346927:key/64dbfdcc-8519-4f8f-a1b2-d704e652259b",
    "Plaintext": "ewoJIm1vbmdvVXNlcm5hbWUiOiAibW9uZ28tdXNlciIsCgkibW9uZ29QYXNzd29yZCI6ICJJUnJFIWp3Y0prejV3R0ZiJFN4KiROQDheIiwKCSJnb29nbGVBcGlLZXkiOiAiODFjYzk3NzAtYzNiZS00NGQyLWExOGQtOTAzOWRiMWYwNjJiIiwKCSJmYWNlYm9va0FwaUtleSI6ICI2YjQ5NGE4ZS1mOWEyLTQ3NzQtOGNiOS0yODFiZDczZTkyNzAiCn0K"
}
--output text --query Plaintext
These options work exactly the same as they do on the encrypt command. Refer to the more detailed explanation of the encrypt command above if you need to.
* The below command can be run on OSX and Windows
aws kms decrypt --ciphertext-blob fileb://secrets.encrypted.json --output text --query PlaintextThe Plaintext value of the JSON object is extracted and returned to the terminal.
ewoJIm1vbmdvVXNlcm5hbWUiOiAibW9uZ28tdXNlciIsCgkibW9uZ29QYXNzd29yZCI6ICJJUnJFIWp3Y0prejV3R0ZiJFN4KiROQDheIiwKCSJnb29nbGVBcGlLZXkiOiAiODFjYzk3NzAtYzNiZS00NGQyLWExOGQtOTAzOWRiMWYwNjJiIiwKCSJmYWNlYm9va0FwaUtleSI6ICI2YjQ5NGE4ZS1mOWEyLTQ3NzQtOGNiOS0yODFiZDczZTkyNzAiCn0KDecoding base64 on OSX and Linux
The base64 --decode part of the command decodes the Base64 encoded ciphertext to plaintext and outputs it to the terminal.
aws kms decrypt --ciphertext-blob fileb://secrets.encrypted.json --output text --query Plaintext | base64 --decodeResults displayed on terminal:
{
	"mongoUsername": "mongo-user",
	"mongoPassword": "IRrE!jwcJkz5wGFb$Sx*$N@8^",
	"googleApiKey": "81cc9770-c3be-44d2-a18d-9039db1f062b",
	"facebookApiKey": "6b494a8e-f9a2-4774-8cb9-281bd73e9270"
}
> secrets.decrypted.json
And finally, if we want to save the plaintext to a file, we simply specify > and a filename.
aws kms decrypt --ciphertext-blob fileb://secrets.encrypted.json --output text --query Plaintext | base64 --decode > secrets.decrypted.jsonDecoding base64 on Windows
The below command decrypts the ciphertext, encodes the result to base64 and saves it to a file.
aws kms decrypt --ciphertext-blob fileb://secrets.encrypted.json --output text --query Plaintext > secrets.decrypted.base64Then, a second command is run to decode the base64.
certutil -decode D:\projects\kms\secrets.decrypted.base64 D:\projects\kms\secrets.decrypted.json{
"mongoUsername": "mongo-user",
"mongoPassword": "IRrE!jwcJkz5wGFb$Sx*$N@8^",
"googleApiKey": "81cc9770-c3be-44d2-a18d-9039db1f062b",
"facebookApiKey": "6b494a8e-f9a2-4774-8cb9-281bd73e9270"
}Conclusion
In this deep dive on AWS KMS, I explained the importance of encrypting secrets at rest. Furthermore, I showed you how to use the AWS KMS CLI to encrypt and decrypt secrets.
At this stage you might be wondering how to decrypt AWS KMS secrets in an application. Stay tuned for the upcoming posts in this series that will cover how to decrypt AWS KMS secrets in ASP.NET Core and Node.js by using the AWS SDK.
If you have any feedback or questions, please let me know in the comments below.